Sunny Side: From Me to You Projects – Takes 6 to 10 {Giveaway Alert}

Oh, Hi there!!  I am so glad you stopped by to see what else I was able to create from this:

12 by 12 paper by Pebbles, Inc - From Me to You from Sunny Side Collection as it appeared before I cut it apart.

12 by 12 paper by Pebbles, Inc – From Me to You from Sunny Side Collection as it appeared before I cut it apart.

I have come up with 10 more projects from this paper and I will be showing them to you 5 at a time in this post and then one more post after that!  I am so very excited with the response I had to my very first giveaway – the prize is all packaged and ready to deliver to the winner!  I am going to offer another giveaway this week but I am going to shorten the comment time but more details on that at the end of this post.   All right, now for the projects:

Take # 6 –  Butterfly Thank you Chocolate Pouch

This notebook paper mini bag from Pebbles in My Pocket is the perfect size for a flat, square Ghirardelli chocolate.  All it took to cute this up was the butterfly thank you square, a couple of Doodlebug brads, matching paper scraps from the Sunny Side paper collection and a mini clothespin - also purchased at Pebbles!

This notebook paper mini bag from Pebbles in My Pocket is the perfect size for a flat, square Ghirardelli chocolate. All it took to cute this up was the butterfly thank you square, a couple of Doodlebug brads, matching paper scraps from the Sunny Side paper collection and a mini clothespin – also purchased at Pebbles!

Take # 7 – “Smile, It’s a Good day” treat scoop
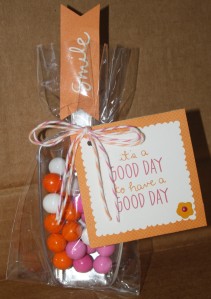
Here's the "scoop" on this fun treat - I got matching colored sixlets from Zurchers and put them into a clear acrylic scoop that went inside a 3 by 5 cello bag.  Using the "good day" square and the smile banner I "cuted" this treat right up! The back side of the square card features a pink background where I can write a note to let someone know that I hope they have a good day!  The smile banner was taped to the handle of the scoop with double stick tape! The scoop itself was a great Dollar Store find!

Here’s the “scoop” on this fun treat – I got matching colored sixlets from Zurchers and put them into a clear acrylic scoop that went inside a 3 by 5 cello bag. Using the “good day” square and the smile banner I “cuted” this treat right up! The back side of the square card features a pink background where I can write a note to let someone know that I hope they have a good day! The smile banner was taped to the handle of the scoop with double stick tape! The scoop itself was a great Dollar Store find!

Take # 8 – “hi, miss you” card

Oh this card, what fun it was to create!  I used The Hi banner and the miss you square, my scallop edge punch and a stick pin from My Mind's Eye and a couple of well placed Doodlebug pearls.  The card itself came from a 50 pack of premade cards w/envelopes by Paper Studio from Hobby Lobby. The blue square is mounted on the card with mounting tape so that the sharp end of the stick pin would be absorbed by it.

Oh this card, what fun it was to create! I used The Hi banner and the miss you square, my scallop edge punch and a stick pin from My Mind’s Eye and a couple of well placed Doodlebug pearls. The card itself came from a 50 pack of premade cards w/envelopes by Paper Studio from Hobby Lobby. The blue square is mounted on the card with mounting tape so that the sharp end of the stick pin would be absorbed by it.

Take # 9 – 4 Pennant Hello card

Using a premade Kraft card from a package I found at Hobby Lobby by Paper Studio this card was a cinch to make!! I took the 4 banner pieces that were the same size and sewed them onto the card with my sewing machine and then I added the green hello pennant!  How cute and simple was that?!?

Using a premade Kraft card from a package I found at Hobby Lobby by Paper Studio this card was a cinch to make!! I took the 4 banner pieces that were the same size and sewed them onto the card with my sewing machine and then I added the green hello pennant! How cute and simple was that?!?

Take # 10 – “Thanks a Bunch” Kraft Treat sack
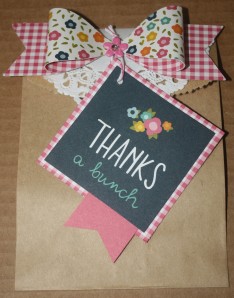
This simple flat kraft bag became a real beauty when I added a die cut bow, a Doodlebug brad, and a doily with the Thanks a bunch square.  The bag could have any kind of treat placed in it but I have tried it out and found that 2 flat square Ghirardelli chocolates fit side by side just perfectly. I layered the square on the same Sunny Side paper that the bow was diecut from.  I got the diecut and the doily from Pebbles in my Pocket!

This simple flat kraft bag became a real beauty when I added a die cut bow, a Doodlebug brad, and a doily with the Thanks a bunch square. The bag could have any kind of treat placed in it but I have tried it out and found that 2 flat square Ghirardelli chocolates fit side by side just perfectly. I layered the square on the same Sunny Side paper that the bow was diecut from. I got the diecut and the doily from Pebbles in my Pocket!

Well, there you go – 5 more Takes using the From Me to You page of the Sunny Side Collection by Pebbles, Inc.  Yes, I know each Take has added things to it besides just the paper piece but that is what I found so fun – using one, two or even a few pieces as a place to start creating!  I hope this has inspired you and helped you realize that a handmade item can start with one cute thing and then be added upon to make it something  completely creative and beautiful!!  But the best part for me in making these is that now I have 5 things that I can use to shower love and care on loved ones!  And you can too if you enter my giveaway!!

Giveaway Alert!!

Leave me some love and let me know what you think!!!  I will be choosing a random commenter to win one of each of these projects that I made – Takes # 6 to 10.  That lucky person will receive all 5 of the fun projects I made for this post!!  Oh, And I will be adding a $10 Cold Stone Gift card in with the prize IF  my comments # reaches 15!!! I will leave comments open until Wednesday, August 14th and then I will post the winner later that evening!! 

My Big Book of Everything

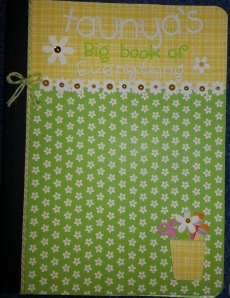
I don’t know about you but I am always making lists on this scratch piece of paper or that receipt.  I was frustrated by this so I decided to make a book to keep all my lists in.  Here is what I came up with.  I used the Fruit Stand collection of my favorite company Doodlebug to cute up a composition notebook.

I have since just started to make lists in it and I have achieved success in keeping all my lists together!!

MyBigBookofEverything

Happy Valen”Twine”s Day!!

Every time I sit down at my craft table - this is the cuteness that I see!

Every time I sit down at my craft table – this is the cuteness that I see!

I saw this cute phrase on a blog and decided I would share  a little Twine love and cuteness with you all! I have become a huge fan of twine and having some in every color is a must! I love many brands of twine but Doodlebug twine is my favorite because it comes in,  yep – you guessed it – all the Doodlebug colors!! The large spools of twine I found at a local store here in town during the Christmas season.  Wanted some in every color but settled for these 3, they match my craft space very well!  Hope you all have something that makes you happy like twine does me & I especially want to wish you a Happy Valen”Twine”s Day!!

Doodlebug Cuteness!!

IMG_5569

I am so excited about this little bit of beautiful cuteness that I had so much fun putting together.  I wanted to showcase the mini Milk Cartons I had made so I grabbed my mini dessert platter and spools of twine, some Doodlebug Washi Tapes and buttons and pearls oh, my! Arranged it all on this doily and there you go.  I had so much using my new mini Milk Carton die that I got for Christmas.  It makes them so easy!  I cuted them up with some mini Love notes that are part of Doodlebug’s Love Birds collection.  I will come back real soon and show you more details about the milk cartons themselves!  Be back soon!

Appreciation Matters! Day 3

For Day  3 of Appreciation Matters let’s talk about the value of a hand written note to say Thanks!  For the final day of LunchLadies, Aides, and Janitorial Staff Appreciation Weeks I gave hand stamped Thank You cards with a personal note to each person with a $10 gift card for something I thought each person would enjoy.  For example I thought the Lunch :Ladies might enjoy a lunch out, the Aides might enjoy ice cream, etc.  But I felt that the true thanks was the personal note that specified some areas for which they were appreciated.  I know that I love specifics when I receive a thank you – I like knowing what it was that I did or said that they are thanking me for.  Cuz if it was good then I certainly want to know so I can do it again! 🙂  Some questions to ask yourself about the person you want to appreciate so you can be specific –

* Does this person do something that you have noticed that only they do? In what ways has the person made his or her approach to their work/role unique?

* When this person interacts with others, what is their attitude, their demeanor?

* Is this person enthusiastic about doing whatever it is you are thankful for? What is their attitude about their job or role?

* Any other ways this person has individualised his or her position or approach to life?

With answers to questions like these you can begin to compose a personal thank you to just about anybody, anywhere, anytime.  Think about it – do these questions fit a church leader or teacher,  how about your neighbor,,  what about the friendly lady checker at the grocery store, a friend or someone at your school?  Give it some thought and write a personal note of thanks to someone today – go ahead – I DARE you!! 🙂

Once you get in the groove of writing notes then you need to stock up on cute cards to write on and then  you can make a cute box to store them all in.  Or you could store all of the thank you’s you have received over the years in a cute box like this. Then you can go back through them and get warm fuzzies from reading them.  And saving them and reading them can help you the next time you go to compose a letter because you can see thanks through another’s voice or voices.  I believe that saving cards with kind words from others makes us want to help add a  bit of beauty & sunshine to another’s world.  And doesn’t the world need more beauty & sunshine!!

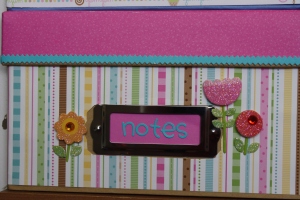
This adorable Note Cards Storage Box started out as a Kraft photo storage box from Michael's that I bought last week.  I added Hello Kitty Kitty paper to the bottom part of the box and used a bubble gum sheet of 12 by 12 paper to cover the lid, then using swimming pool colored paper frills I put a border on the lid.  Found this 3 flowered Doodlepop to complete the cuteness!
This adorable Note Cards Storage Box started out as a Kraft photo storage box from Michael’s that I bought last week. I added Hello Kitty Kitty paper to the bottom part of the box and used a bubble gum sheet of 12 by 12 paper to cover the lid, then using swimming pool colored paper frills I put a border on the lid. Found this 3 flowered Doodlepop to complete the cuteness!

Magnet Trio & mini Chalkboard Eraser

This trio of magnets and mini chalkboard eraser came with the Message Center I mentioned that I got from Savers. The bottom portion of it is a magnetic chalkboard that needed some touching up. The magnets were plain white wooden circles. As you can see I “cute”d them up with doodlebug stuff!

Using brads, paper, stickers, buttons, twine,and etc I was successful at “Cute”ing up these essential items for my Message Center.  I found the circles easy to decorate as they were 1 1/4″ circles.  I was able to use a circle punch to add details to them.  I decided the eraser needed to be cute on the front and not the top because the front is what is seen more.  So I used a fun fancy frill and a icon in yellow and green  in keeping with my color scheme.  After punching a 1/8” inch hole on either side of the oval icon I threaded some thin ribbon through the holes and then knotted the ribbon on top of the sticker.  See photo to get this. 🙂  I love daisies as my blog says so when I “cute” things up they usually factor in somewhere along with my favorite color yellow!  I sure hope when you make cute, beautiful things to add to your life that you include your favorite colors and things!!  I will be posting soon a picture of the completed message center – mini bunting and all!!

A Little “Happy Mail”

I wanted to send my own bit of “Happy Mail” to a incredibly talented person at Doodlebug. Saying thanks for a fabulous day there back in May was a pleasure for me to get to do!!

It is easy peasy to make a cute card faster than you can say Doodlebug using the Create-A-Card products!  Simply pick one and add some cute tidbits from any of their product lines and there you go!  I used 2 pieces from the Sugar & Spice creative cuts, a fancy frill, some twine, and a brad.  It all coordinated very well if I do say so myself.  But the best part is that inside was a hand-written note expressing my thanks and my delight in my Doodlebug visit in May.  The event was National Scrapbooking day and what a FUN day it was!  I sure hope it is in the plans for the upcoming year!!:)

Daisies Brighten My Day

Found this daisy embossed paper from Doodlebug – I knew I could make something beautiful with it!

One day my children and I were at Savers when I came across this way cool white message center. The top half was padded for push pins to go in and the bottom half was a magnetic chalkboard.  For the top half I remembered the daisy embossed paper I had come across and thought I could use that to cover up the top half.  It is currently being held on with yellow headed straight pins since the double stick tape I used did not quite do the trick.  I used all Doodlebug products to “Cute” this part up and to express the delight I find in Daisies!! The big flower in the upper corner is a Doodlepop I found that matched perfectly.  I used brads, buttons, icons, and fancy frills to add to it.  I also used yellow chalk to color on some of the embossed daisies and draw attention to them.  I am so pleased with how it turned out and this is one Beautiful thing that totally brightens up my life!

Sewing Table Drawer Makeover

The drawer of my sewing table is not to big – about 2 3/4″ by 15″ in the space I filled in with scraps in order to make it look sort of patchwork “quilt”y.  And I used some of the fancy frills to cover up the line where my scraps did not completely match up.  And for the knob on the drawer I put a button icon on it.  I used Mod Podge to put all pieces on and then I went over the whole thing with it to finish it off.  If you look closely you can see the spools of thread border, the measuring tape border, and green scalloped border.  Using Doodlebug products to “cute” things up sure does make me smile! Both when I make it and then again every time I see it!

So in my desire to create a beautiful place for me to craft in I grabbed some Doodlebug Products. I used some 12 by 12 paper, fancy frills, and icons to give the drawer front a makeover. Here is how it turned out.